XDStar Client
Introduction
XDStarClient is a tool developed by IHE-Europe / Gazelle team to simulate initiators of the XD* profiles.
Below are listed the transactions supported by the tool, as initiator :
-
for epSOS domain :
-
DispensationService:Discard()
-
ConsentService:put()
-
ConsentService:Discard()
-
epSOS-1 [OrderService / PatientService]
-
Identification Service
-
ITI-41 [XDS.b Provide and Register Document Set - epSOS affinity domain]
-
epSOS-2 transactions
-
-
for IHE, ITI domain :
-
XDS.b
-
ITI-18 : Registry Stored Query
-
ITI-41 : Provide and Register Document Set.b
-
ITI-43 : Retrieve Document Set
-
ITI-62 : Delete Document Set
-
-
XCA
-
ITI-38 : Cross Gateway Query
-
ITI-39 : Cross Gateway Retrieve
-
-
XDR
-
ITI-41 : Provide and Register Document Set.b
-
ITI-62 : Delete Document Set
-
-
XDW (XDS.b)
-
ITI-18 : Registry Stored Query
-
ITI-41 : Provide and Register Document Set.b
-
ITI-43 : Retrieve Document Set
-
-
XCF
- ITI-63 [Cross Gateway Fetch]
-
MPQ
- ITI-51 [Multi-Patient Stored Query]
-
XCPD
-
ITI-55 [Cross Gateway Patient Discovery]
-
ITI-56 [Patient Location Query]
-
-
-
IHE, PHARM domain :
- PHARM-1
-
IHE, RAD domain :
-
RAD-68 : Provide and Register Imaging Document Set - MTOM/XOP
-
RAD-69 : Retrieve Imaging Document Set
-
RAD-75 : Cross Gateway Retrieve Imaging Document Set
-
RAD-55 : WADO Retrieve
-
XDStarClient also simulates some responders for the following transactions:
-
ITI-62 - Delete Document Set
-
ITI-53 - Document Metada Recipient Endpoint
XDStarClient validation services
XDStarClient offers three validation services :
-
XDS metadata validation
-
WADO validation
-
DSUB validation
SUT Configurations
If you want to use this tool to test your system, you have to make sure that your system is stored in the list of configurations.
To do that, go to SUT Configurations menu and select your configuration type. Then you will see all available configurations for testing. To add your configuration you have to click on the button “Create configuration type”. If you don’t see this button, that means that you are not logged in. Only logged users are allowed to add a system configuration to the XDStarClient tool.
To log in this tools, you have to use the link “CAS login” on the menu. The login and password are the same as your credentials in Gazelle Test Management.
After logging in, you will be able to add a configuration, on the page:

When clicking on the button “Create configuration type”, you will be able to add your configuration to the tool :

Simulators
ITI-18: Registry Stored Query
Tool description
The aim of this tool is to simulate an XDS consumer for the transaction Registry Stored Query (ITI-18), of the IHE ITI domain.
This module allows vendors to query registries using XDS metadata.
To access this simulator, you have to check the menu SIMU-Initiators –> IHE [ITI] –> XDS.b – > ITI-18 [Registry Stored Query]

When going from the menu SIMU-Initiators –> IHE [ITI] –> ITI-18 [Registry Stored Query], and after selecting your configuration and the message type, a panel for editing metadata appears :

Then, click on “Execute” button to send the request.
ITI-41: Provide and Register Set-b
Simulator Description
The aim of this module is to simulate a document source actor for the ITI-41 transaction (IHE domain).
This module allows vendors to submit documents, folders and associations between documents, folders and submissionSet.
To access this simulator, you have to check the menu SIMU-Initiators –> IHE [ITI] –> ITI-41 [Provide and Register Set-b]

metadata edition and configuration
Initialization of the request
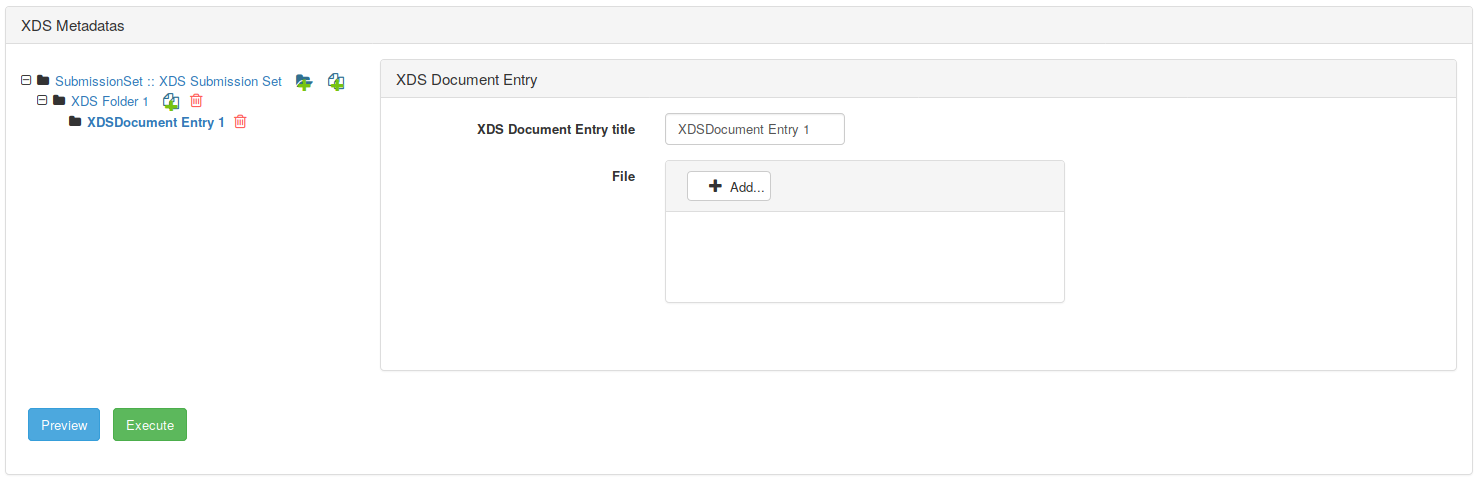
When going from the menu SIMU-Initiators –> IHE [ITI] –> XDS.b – > ITI-41 [Provide and Register Set-b], and after selecting your configuration, a panel for editing metadata and for configuring your submission request appears :

This panel contains two sides : a tree which represents the folders and documents on a side, and the metadata for each component on the submissionSet on the other side.
The patient Id will be used for all submitted documents, folders and for the submissionSet. The sourceId is, by default, the one assigned to XDStarClient, and the uniqueId is automatically generated by the tool.
If a metadata is present by default on the table of metadata, that means that this metadata is required. For example, for submissionSet, the XDSSubmissionSet.contentTypeCode is required. The value that you can select for this metadata are the displayName of codes that are used for Connectathons. These codes can be taken from http://hit-testing.nist.gov:12080/xdsref/codes/codes.xml, or from the SVS simulator as REST request. Value sets currently used are listed below:
| 1.3.6.1.4.1.12559.11.4.3.1 | contentTypeCode |
|---|---|
| 1.3.6.1.4.1.12559.11.4.3.2 | classCode |
| 1.3.6.1.4.1.12559.11.4.3.3 | confidentialityCode |
| 1.3.6.1.4.1.12559.11.4.3.4 | formatCode |
| 1.3.6.1.4.1.12559.11.4.3.5 | healthcareFacilityTypeCode |
| 1.3.6.1.4.1.12559.11.4.3.6 | practiceSettingCode |
| 1.3.6.1.4.1.12559.11.4.3.7 | eventCodeList |
| 1.3.6.1.4.1.12559.11.4.3.8 | typeCode |
| 1.3.6.1.4.1.12559.11.4.3.9 | mimeType |
| 1.3.6.1.4.1.12559.11.4.3.10 | folderCodeList |
| 1.3.6.1.4.1.12559.11.4.3.11 | associationDocumentation |
Additional metadata can be added to the submissionSet, by clicking on the button “Add Optional Metadata” at the bottom of the table of metadata. A list of Optional metadata will appear, and you can then select the one you want. Additional metadata can be deleted from the table after being added :

Attach XDSFolder to submissionSet
To Attach an XDSFolder to an XDSSubmissionSet, you have to click on the icon “Add XDSFolder to the SubmissionSet”:

When clicking on add folder, a new XDSFolder appears in the tree. On the right side, you can see the list of required metadata related to the XDSFolder :

For each XDSFolder, you can attach an XDSDocument by clicking on the icon “Add XDSDocument to the folder”
 .
.
Attach XDS Document Entry
To attach an XDSDocumentEntry to an XDSFolder or to the submissionSet, you have to click on the icon . You can see then that a new entry is added to the tree, containing a link to the XDSDocument entry. On the left side, you can see an upload component, to upload your document to submit :
After uploading your file, you will see that a the list of metadata has been rendered. This list contains the required XDS metadata. To add optional metadata, you have to click on the button “Add optional Metadata”, and then select the metadata to add, and finally add your data on the table of metadata :

After creating your submissionSet, with folders and documents, you can then send the request using the button ‘Execute’.
The request is formatted as MTOM/XOP request, and sent to the specified URL.
The result of the transaction is shown on table at the bottom of the page :

From the id column, you can access a permanent link to the messages (the request and the response). Action buttons are : view and validate.
- The view button shows the two messages : request and response.
- The second button calls the validator to check the conformance of both the request and the response:

ITI-43: Retrieve Document Set
To access this simulator, you have to check the menu SIMU-Initiators –> IHE [ITI] –> XDS.b – > ITI-43 [Retrieve Document Set]
This tool provides the possibility to create a valid request according to the ITI-43 transaction specification. The generated request allows to retrieve a document (or a list of documents) from a repository or a document recipient.
To use this tool you have to :
-
Select your responder configuration or add a new one on the page SUT Configurations.
-
Fulfill the metadata of the request, for each document you are looking for.
-
Click on the button ‘Execute’ to retrieve document(s).

The result of the sent SOAP request is displayed on the table after you click on the button ‘Execute’, in the panel ‘Execution Summary’.

To view the content of the messages, you have to click on the magnifying-glass icon. A popup will be displayed with the content of the sent and received messages.
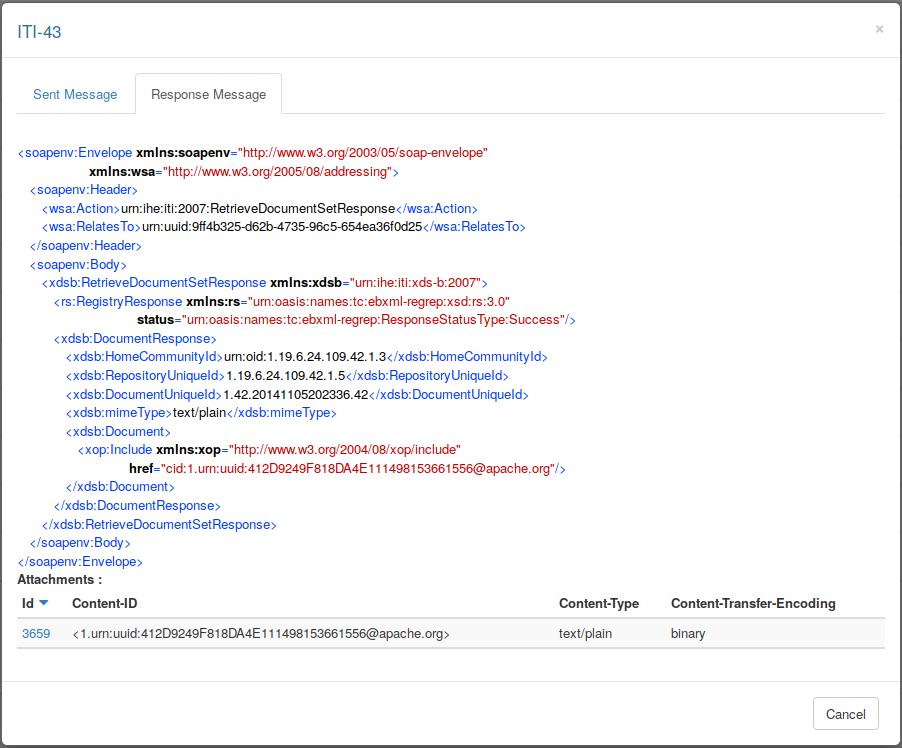
You can download the received file(s) from the table which gathers the received attachments.
ITI-62: Delete Document Set
To access this simulator, you have to check the menu SIMU-Initiators –> IHE [ITI] –> XDS.b – > ITI-62 [Delete Document Set]
This tool allows to simulate the ITI-62 transaction. This transaction triggers the deletion of document(s) from a repository.
To use this tool you have to :
-
Select your repository configuration or add a new one on the page SUT Configurations.
-
Fulfill the request parameters, which are a list of ObjectRef ID.
-
Execute the request using the button ‘Execute’. You can preview your SOAP request by using the button ‘Preview’.

After clicking on ‘Execute’ button, a table will be displayed, containing the result of the execution.

ITI-61 : Register On-Demand Document Entry
To access this simulator, you have to check the menu SIMU-Initiators –> IHE [ITI] –> XDS.b – > ITI-61 [Register On-Demand Document Entry]
This tool provides the possibility to create a valid request according to the ITI-61 transaction definition.
To use this tool, you have to select your configuration or add a new one on the page SUT Configurations.

To have more information about this tool, please refer to ITI-41 : Provide and Register Set-b section. It is the same use.
ITI-57 : Update Document Set
To access this simulator, you have to check the menu SIMU-Initiators –> IHE [ITI] –> XDS.b – > ITI-57 [Update Document Set]
This tool provides the possibility to create a valid request according to the transaction ITI-57. The generated request triggers the update of a document from the Document Administrator to the Document Registry or the Document Recipient.
To use this tool, you have to :
- Select your responder configuration or add a new one on the page SUT Configurations,
- Fulfill metadata of the request according to the metadata you want to update,
- Click on the button ‘Execute’ to send the request.

To have more information about how to use this tool, please refer to the ITI-41 : Provide and Register Set-b section.
ITI-38 : Cross Gateway Query
Tool description
This tool provides the possibility to create a valid request according to the transaction ITI-38. The tool participates as an Initiating Gateway to this transaction.
Test your system with XDStarClient
Go to menu –> XDStarClient > Simulators > IHE [ITI] > XCA > ITI-38 [Cross Gateway Query] .

Then select your configuration, your message type, and fulfill metadata. Click then on the button “Execute”.

ITI-39 : Cross Gateway Retrieve
Tool description
This tool provides the possibility to create a valid request according to the transaction ITI-39. The request generated allows to retrieve a document (or a list of documents) from a repository or a document recipient.
Test your system with XDStarClient
Go to menu –> XDStarClient > Simulators > IHE [ITI] > XCA > ITI-39 [Cross Gateway Retrieve] .
Then select your configuration, your message type, and fulfill metadata. Click then on the button “Execute”.

To have more information about this transaction, go to the ITI-43 : Retrieve Document Set section.
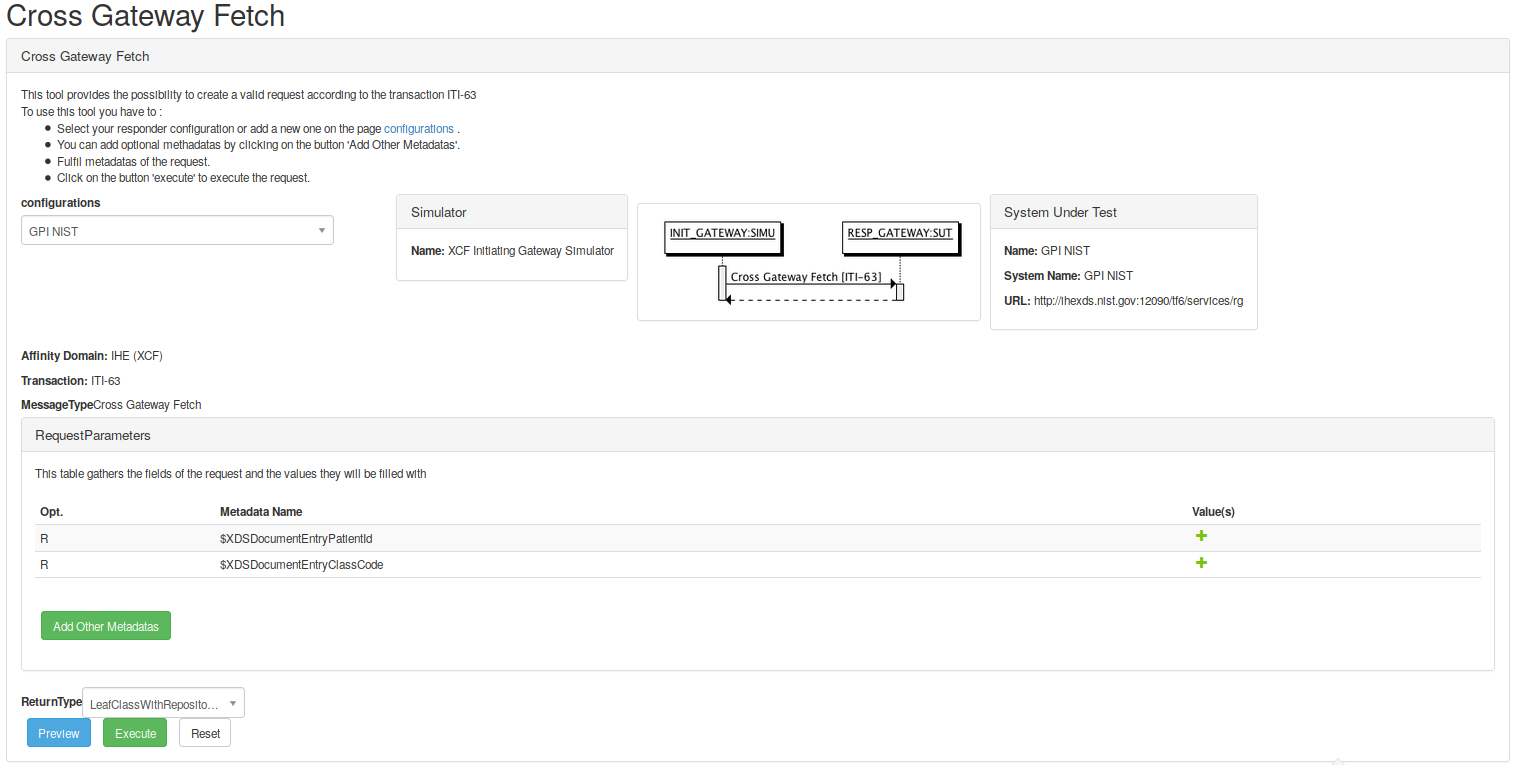
ITI-63 : Cross Gateway Fetch
To access this simulator, you have to check the menu SIMU-Initiators –> IHE [ITI] –> XCF –> ITI-63 [Cross Gateway Fetch]
This tool provides the possibility to create a valid request according to the transaction ITI-63. The Cross-Community Fetch (XCF) Profile defines a single transaction for accessing medical data between gateways that facilitate multiple dimensions of communication (trust, semantics, 185 encoding, legislation, authority, etc.). The profile is highly inspired by the Cross Gateway Query/Cross Gateway Retrieve transactions.
To have more information about how to use this tool, please refer to ITI-38 : Cross Gateway Query section.
ITI-51 : Multi-Patient Stored Query
To access this simulator, you have to check the menu SIMU-Initiators –> IHE [ITI] –> MPQ –> ITI-63 [Multi-Patient Stored Query]
This tool provides the possibility to create a valid request according to the transaction ITI-51.
The request generated allows to query registries using XDS metadata based on criteria common to multiple patients.

This transaction is based on ITI-18 transaction. So, to have more information about how to use this tool, please refer to ITI-18 : Registry Stored Query section.
ITI-52 : Document Metadata Subscribe
This transaction involves a request by the Document Metadata Subscriber to the Document Metadata Notification Broker to start a subscription using a particular set of filters, or to cancel an existing subscription.
ITI-52 : Document Metadata Subscribe - Subscribe Request
To access this simulator, you have to check the menu SIMU-Initiators –> IHE [ITI] –> DSUB –> ITI-52 [Document Metadata Subscribe - Subscribe Request]
This tool provides the possibility to create a valid request according to the transaction ITI-52 to start a subscription.
The subscribe request generated is sent to the Document Metadata Notification Broker.
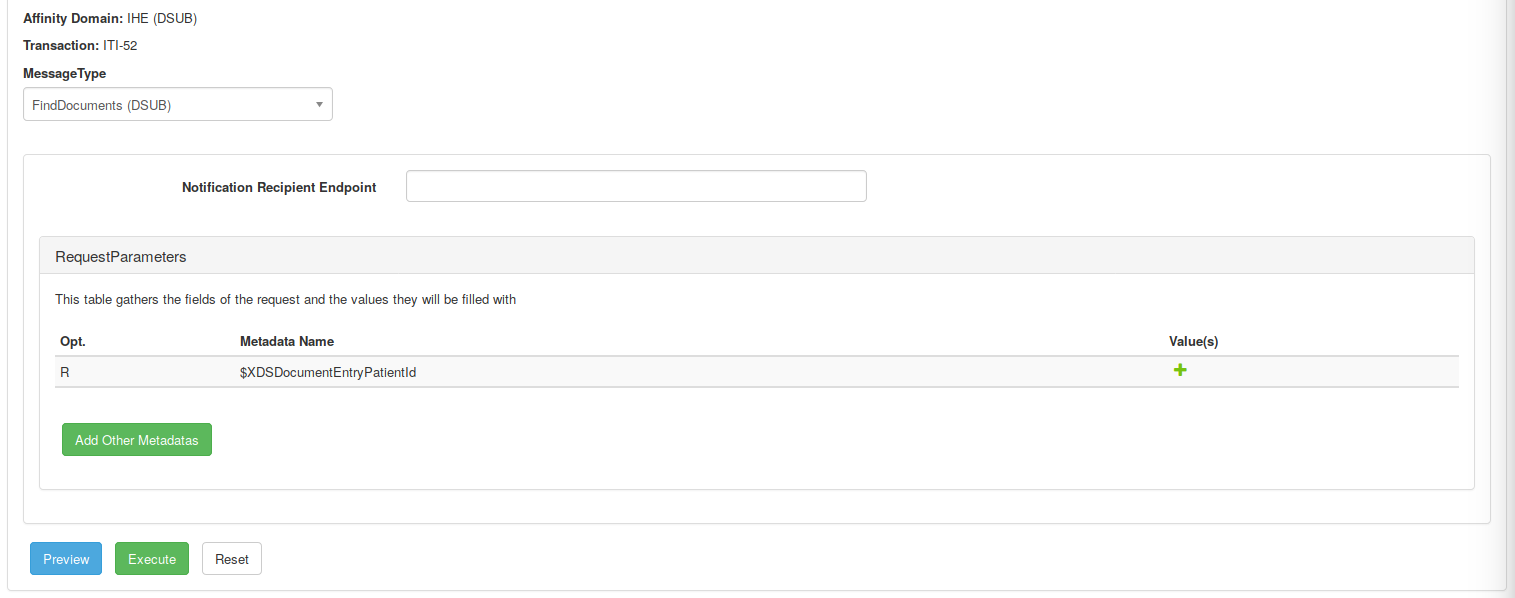
To use this tool, you have to :
- Select your responder configuration or add a new one on the page SUT Configurations,
- Select the message type.

Then, specify the Notification Recipient Endpoint and add the metadata of the request. You can add optional metadata by clicking on ‘Add Other metadata’. Click on the button ‘Execute’ to send the request.
After clicking on ‘Execute’ button, a table will be displayed, containing the result of the execution.

ITI-52 : Document Metadata Subscribe - UnSubscribe Request
To access this simulator, you have to check the menu SIMU-Initiators –> IHE [ITI] –> DSUB –> ITI-52 [Document Metadata Subscribe - UnSubscribe Request]
When a subscription is no longer needed, a Document Metadata Subscriber will trigger an Unsubscribe Request message.
This tool provides the possibility to create a valid request according to the transaction ITI-52 to Unsubscribe.
To use this tool, you have to :
- Select your responder configuration or add a new one on the page SUT Configurations,
- Specify the Notification Subscription ID of the subscription to be removed
- Click on ‘Excute’ button to send the request.

ITI-53 : Document Metadata Notify
To access this simulator, you have to check the menu SIMU-Initiators –> IHE [ITI] –> DSUB –> ITI-53 [Document Metadata Notify]
When an event occurs where the topics of the event match the filter requirements of one or more existing subscriptions, the Document Metadata Notification Broker will trigger a Notification message to the corresponding Document Metadata Notification Recipient.
This tool provides the possibility to create a valid request according to the transaction ITI-53.
To use this tool, you have to :
- Select your responder configuration or add a new one on the page SUT Configurations,
- Select the message type, you can choose between XDSDocumentEntry, XDSSubmissionSet or XDSFolder.

You can add one or multiple XDSDocumentEntry, XDSSubmissionSet or XDSFolder according to the message type you choose to the current Notify request by clicking on the icon ‘Add’ on the panel ‘Notify Parameters’.
Fulfill all the metadata, you can add optional metdatas by clicking on ‘Add other metadata’. The example below is for an XDSDocumentEntry.

Then, click on the button ‘Execute’ to send the request.
ITI-54 : Document Metadata Publish
This tool allows to simulate the transaction ITI-54 between a Document Metadata Publisher and a Document Metadata Notification broker. The tool plays the role of a Document Metadata Publisher.
To access the tool you should go to XDStarClient > Simulators > IHE [ITI] > DSUB > ITI-54 [Document Metada Publish]
Then you have to select your ‘System Under Test’, i.e. the Document Metadata Notification broker.

You may add submission set, a folder, or a document entry to the publish request using the buttons : , or
After fulfilling the metadata related to each entry, you can send the webservice message using the button ‘Execute’.

After execution, the ‘Execution Summary’ is displayed as shown below and you may access the result of the request by clicking either the ‘Id’ permanent link or the loop icon button.

ITI-55 : Cross Gateway Patient Discovery
To access this simulator, you have to check the menu SIMU-Initiators –> IHE [ITI] –> XCPD –> ITI-55 [Cross Gateway Patient Discovery]
This tool provides the possibility to create a valid request according to the transaction ITI-55.
The Cross Gateway Patient Discovery request asks for information about patients whose demographic data match data provided in the query message. The request is received by the Responding Gateway Actor. The Responding Gateway indicates in its response whether the community has knowledge of a patient matching the set of demographic data and, if a match is found, returns the demographics known by the responding community.
To use this tool, you have to :
- Select your responder configuration or add a new one on the page SUT Configurations,
- Fulfill the request parameters including the sender and the receiver homeCommunityId,
- Then you have to execute the request using the button ‘Execute’.

ITI-56 : Patient Location Query
To access this simulator, you have to check the menu SIMU-Initiators –> IHE [ITI] –> XCPD –> ITI-56 [Patient Location Query]
This tool provides the possibility to create a valid request according to the transaction ITI-56.
To use this tool, you have to :
- Select your responder configuration or add a new one on the page SUT Configurations,
- Fulfill the request parameters including the patient id root and extension,
- Then you have to execute the request using the button ‘Execute’.

ITI-92 : Restricted Update Document Set
To access this simulator, you have to check the menu SIMU-Initiators –> IHE [ITI] –> RMU –> ITI-92 [restricted Update Document Set]
This tool provides the possibility to create a valid request according to the transaction ITI-92.
The ITI-92 transaction provides a capability to change selected metadata attributes of documents registered and stored in another community.
To use this tool, you have to :
- Select your responder configuration or add a new one on the page SUT Configurations,
- Fulfill the homeCommunityId,
- Fulfill the XDSSubmissionSet of the document you want to update

You can update XDSDocumentEntry or XDSDocumentEntry and XDSFolder association. To have more information about how to fulfill XDS metadata, please refer to the ITI-41 : Provide and Register Set-b section.
Finally, click on the button ‘Execute’ to send the request.
PHARM-1 : Query Pharmacy Documents
To access this simulator, you have to check the menu SIMU-Initiators –> IHE [PHARM] –> PHARM-1 [Query Pharmacy Documents]
This tool provides the possibility to create a valid request according to the transaction PHARM-1.
To use this tool, you have to :
- Select your responder configuration or add a new one on the page SUT Configurations,
- Choose the message type and fulfill the request parameters,
- You can add optional metadata by clicking on “Add Other Metadata”
- Then you have to execute the request using the button ‘Execute’.

RAD-68 : Provide and Register Imaging Document Set - MTOM/XOP
To access this simulator, you have to check the menu SIMU-Initiators –> IHE [RAD] –> XDS-I.b –> RAD-68 [Provide and Register Imaging Document Set - MTOM/XOP]
This tool provides the possibility to send documents to a repository or a document recipient using the transaction RAD-68.
To use this tool you have to :
-
Select your repository configuration or add a new one on the page SUT Configurations. For more documentation about how to add configuration, please refer to the SUT Configurations section.
-
Fulfill metadata of the submissionSet. The patientId of the submissionSet is required.
-
Upload the document(s) to submit, and fulfill IHE metadata related to the document(s). Uploaded documents shall be DICOM KOS Manifest or CDA documents.
-
Click on ‘Execute’ button to send the document(s) to the selected configuration.
RAD-68 transaction is very similar to the ITI-41 transaction, with different metadata.

For more documentation on how to fulfill the metadata, please refer to the documentation of ITI-41 transaction.
RAD-69 : Retrieve Imaging Document Set
To access this simulator, you have to check the menu SIMU-Initiators –> IHE [RAD] –> XDS-I.b –> RAD-69 [Retrieve Imaging Document Set]
This tool provides the possibility to create a valid request according to the transaction RAD-69. The request generated allows to retrieve a DICOM document (or a list of documents), based on informations provided by the KOS Manifest.
To use this tool you have to :
-
Go to menu > > Simulators > IHE [RAD] > XDS-I.b > RAD-69 [Retrieve Imaging Document Set]
-
Select your responder configuration or add a new one on the page SUT Configurations.
-
Fulfill metadata of the request, for each document you are looking for.
-
Click on the button ‘Execute’ to retrieve document(s).
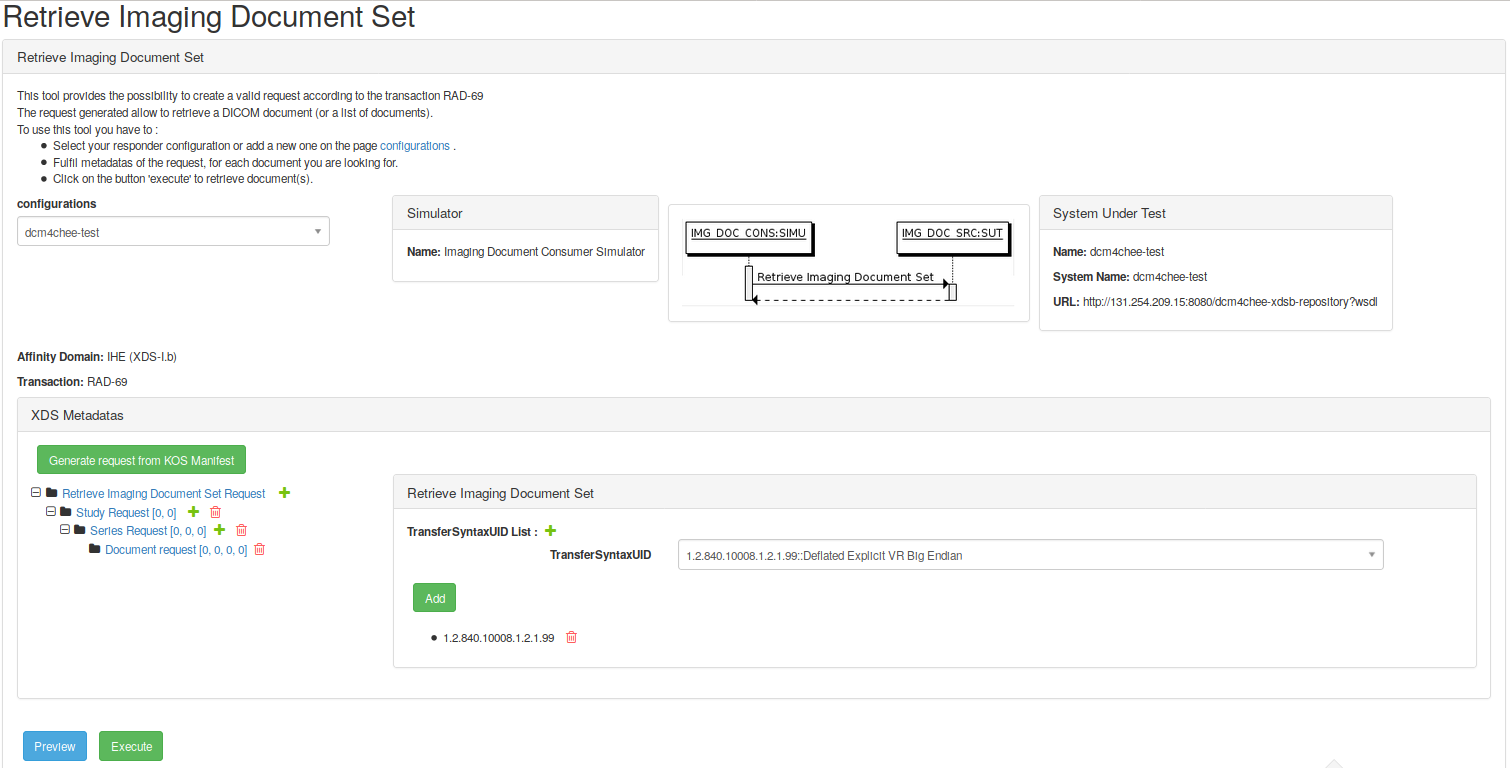
This tool offers the possibility to upload a KOS manifest, and then generate the corresponding SOAP request to retrieve the DICOM SOP instances.

After clicking on ‘Execute’ button, the SOAP request is sent, and the result of the request can be seen in the table displayed.
RAD-55 [WADO Retrieve]
To access this simulator, you have to check the menu SIMU-Initiators –> IHE [RAD] –> XDS-I.b –> RAD-55 [WADO Retrieve]
This tool provides the possibility to create a valid request according to the transaction RAD-55.
To use this tool you have to :
-
Select your responder configuration or add a new one on the page SUT Configurations.
-
Fulfill metadata of the request.
-
Click on the button ‘Execute’ to retrieve the document requested.

The attribute of the request are the same specified by DICOM but restricted by IHE.
The validator of WADO request is integrated into XDStarClient. To validate a WADO Request you have to refer to the validation of WADO Request in EVSClient tool.
Validate XDS-I.b Retrieve Imaging Document Set Request
To access this validator, you have to check the menu SIMU-Initiators –> IHE [RAD] –> XDS-I.b –> Validate XDS-I.b Retrieve Imaging Document Set Request
This tool provides the possibility to validate Retrieve Imaging Document Set Request according to a KOS Manifest.

To use this tool, you have to :
- Import the Retrieve Imaging Document Set Request XML file,
- Import the KOS Manifest,
- Click on ‘Validate the Retrieve Imaging Document Set Request according to the KOS Manifest’.
RAD-75 : Cross Gateway Retrieve Imaging Document Set
To access this simulator, you have to check the menu SIMU-Initiators –> IHE [RAD] –> XCA-I –> RAD-75 [Cross Gateway Retrieve Imaging Document Set]
This tool provides the possibility to create a valid request according to the transaction RAD-75. The request generated allows to retrieve a DICOM document (or a list of documents), based on informations provided by the KOS Manifest.

To have more information about how to use this tool, please refer to RAD-69 : Retrieve Imaging Document Set section.
Responders
ITI-62 : Delete Document Set Responder
This tool implements an endpoint to receive Delete Document Set messages, acting as a Document Registry Actor.

To access the description of the transaction in XDStarClient, you have to go to : menu –> SIMU-Responders -> ITI-62 - Delete Document Set

The WSDL used and acting as ITI-62 responder depends on the configuration of XDStarClient used, and is configured by the administrator of the tool, and specified in the page of definition of the transaction in the tool :

To view the list of request received by the simulator, you have to go from the menu –> Messages –> Simulator as Responder, and then you have to select the transaction ITI-62.
ITI-53 : Document Metada Recipient Endpoint
This tool implements an endpoint to receive metadata notifications, acting as a Document Metadata Notification Recipient.

To go to the description of the transaction in XDStarClient, you have to go to : menu –> SIMU-Responders -> ITI-53 - Document Metada Recipient Endpoint
The WSDL used and acting as ITI-53 responder depends on the configuration of XDStarClient used, and is configured by the administrator of the tool, and is specified in the page of definition of the transaction in the tool :

To view the list of Notifications received by the simulator, you have to go from the menu –> Messages –> Simulator as Responder, and then you have to select the transaction ITI-53.

List of messages
You can get all messages sent by this tool from the menu : Messages –> Simulator as Initiator :

Manage Patient
List Patients
This page allows to get list of patients stored in the database. These patients are used by the gazelle XCPD Responder to respond to requests from other XCPD initiators (either for IHE domain or epSOS domain).
You can also use a patient from this list to submit a document to the repository / registry of gazelle, which are configured for the epSOS domain. EpSOS Requests that can be done around these patients are DispensationService:initialize() and Consent:put(). To create the patientId from attributes describing a patient, you have only to select the ‘Patient Identifier’ and add the suffix ^^^&2.16.17.710.812.1000.990.1&ISO.
If you are not logged, you only can see list of patient. If you are logged as administrator, you can edit patient from the list.

Add Patient
You can add new patient only if you are logged.
To add patient, you have to fulfill all the fields and then click on “Save Person”.

Generate Patients
You can generate patients only if you are logged.
To generate patients, you have to fulfill all the fields and then click on “Generate Patients”.

XDS metadata validation
XDStarClient provides a validation service for XDS metadata.
The validation tool is based on Schema and Model Based validation, and for some kind of validation NIST validation services are used.
The endpoint of the validation service depends on the XDStarClient installation environment, locally it will be http://localhost:8080/XDStarClient-XDStarClient-ejb/XDSMetadataValidatorWS?wsdl.

The documentation of XDS metadata constraints is available in XDStarClient GUI : menu -> Documentation -> XDS Classes Documentation

WADO validator
Gazelle WADO Validator
Gazelle WADO Validator is dedicated to the validation of WADO request message through SOAP web service calls.
The validation of WADO request can be performed against DICOM PS 3.18 or IHE RAD TF-3 (RAD-55 transaction) standards. Notice that performing a validation against IHE RAD TF-3 includes the validation against DICOM PS 3.18.
This validation service is available through a web service API so it can be integrated in your application. If you wish to validate messages occasionnaly you can use the Gazelle Validation Front-End called EVS Client which puts at your disposal a user interface to validate WADO requests, HL7 messages, CDA documents, XD* requests and so on.
Web Service
The web service API of the tool offers three methods:
-
validateDocument(): validates the given message and sends back a validation report
-
about(): gives information about the running version of the tool
-
getListOfValidators() : return the list of validator names. Each validator represents a standard the message can be validated against.
The validateDocument() method has the following prototype:
public String validateDocument(String, String) throws SOAPException ;
-
The first parameter stands for the message to validate itself.
-
The second parameter is the validator to use for validation. The available names list can be retreive using getListOfValidators().
DSUB Validation
XDStarClient provides a validation service for DSUB messages.
The validation tool is based on Schema and Model Based validation. The documentation of the constraint from the model of validation can be found on XDStarClient : menu -> Documentation -> DSUB Classes Documentation.

The endpoint of the validation service depends on the XDStarClient installation environment, it looks like this : http://131.254.209.20:8080/XDStarClient-XDStarClient-ejb/DSUBValidatorWS?wsdl
