HPD Simulator
Introduction to the HPD Simulator tool
The HPD Simulator tool is developed in conformance with the IHE technical framework, that means that national extensions are not taken into account. This simulator is expected to act as an initiator or as a responder depending on the emulated actors.
As an initiator, this simulator is aimed to send messages to a responder. Consequently, if your system (named SUT or System Under Test) is ready to listen to a SOAP request and reachable from the Internet, you will be able to received messages from the simulator.
The table below gathers the supported affinity domains, transactions and SUT actors.
| Integration profile | Actor | Option | Transaction | Affinity domain | System under test actor |
|---|---|---|---|---|---|
| Healthcare Provider Directory | Provider Information Directory | Provider information feed | ITI-59 | IHE | Provider Information Consumer |
| ” | Provider Information Directory | None | ITI-58 | IHE | Provider Information Source |
| ” | Provider Information Consumer | None | ITI-59 | IHE | Provider Information Directory |
| ” | Provider Information Source | None | ITi-58 | IHE | Provider Information Directory |
What is this simulator able to do ?
This simulator has been developed with the purpose of helping developers of IHE systems to test their systems with another IHE compliant system off connectathon periods. We try to manage most of the cases, that means that, step by step, we planned to offer you all the features defined in the technical framework. We also plan to implement national extensions if requested by the different organizations. Nevertheless, this tool is not a reference implementation.
For more details regarding an actor in particular, go to one of the sections below:
-
HPD - Provider Information Directory
-
HPD - Provider Information Consumer
-
HPD - Provider Information Source
Adding your system as a receiver (Provider Information directory)
In order to send messages to your system under test, the HPD Simulator tool needs to know the location of the web service endpoint of your system. This configuration has to be stored in the database of the application, so that you can re-use this configuration without creating it each time you need to perform a test. In order to proceed to configure the HPD Simulator, go to “SUT Configuration” and hit the “Create a new configuration” button. You can also copy or edit an existing configuration (one of yours !).
In both cases, the simulator needs to know:
-
The name of your configuration (shall be unique through the application)
-
The name of your system under test (informational)
-
The URL of your endpoint
-
The base DN of your LDAP directory (to pre-fill the messages)
-
The transactions supported by your system (so that the tool knows which configurations are available depending the cases)
Message validation
The HPD Simulator embeds the validation service for checking the conformance of DSMLv2 messages exchanged in the context of the HPD profile. For each received and sent messages, you can ask the simulator to validate the messages. Below is the meaning of the different icons you can meet in the Test Report section of each page or under the Messages menu (gathers all the messages received and sent by the simulator).
| Buttons (right-hand columns) | Action |
|---|---|
 |
Redirect to the permanent link gathering all the information about the selected exchange of messages |
 |
Call the validation service for the two messages (request/response) and display the result |
 |
Hide the message from users (only available to admin users) |
 |
Replay the message |
| Icons (beside message type) | Action |
 |
The message has been validated but the the validation service has found errors |
 |
The message has been validated, no error found |
|
The message has not been validated yet |
HPD - Provider Information Consumer
The Provider Information Consumer part of the tool is able to send DSMLv2 messages to query for healthcare providers.
To start, you will need to register your system under test as a HPD Provider Information Directory actor. To do so, go to SUT Configuration from the top menu bar and hit the “create a new configuration” button. Fill out the displayed form. Be aware that the URL you provide must be reachable by the tool (do not use private IP address nor host names).
Then, go to Simulators → Provider Information Consumer.
On that page, first select your system under test in the drop-down list and ensure that the connection information are correct.
A DSML message can contain several queries. To add a searchRequest element to the message which will be sent to your system:
-
Click on “Append a new request”
-
Select the organizational unit to query on. This will set the base DN for search
-
If needed, set the request options in the first panel
-
Set the filter in the second panel. You can add assertions by dropping the boxes from left to right. Populate the required fields (marked with a red *) before adding another assertion.
-
If you want to restrain the content of the response to a sub set of attributes, open the “Expected attributes selection” panel and select all the attributes one by one.
Note that the tool has been populated with the list of object classes and attributes which might be known by the LDAP directory, this will help you with building your queries.
When you have all your search requests ready, hit the “Send request” button. The response is stored in the database and parsed by the tool. If its contains entries, their content will be displayed below the test report. The latter contains the messages sent and received which can be validated by calling the Gazelle HPD validation service (hit the green button).
Finally, a button invites you to perform another query. You will be able to either start a new message from scratch or to reuse the previous message.
Tips
When your message contains several searchRequest elements, you can edit or delete them using the icons on the right-hand of each message (under Batch Request).
HPD - Provider Information Directory
We did not implement our own LDAP directory but make use of the ApacheDS open source tool which supports LDAP3 and DSMLv2 queries.
Nevertheless, we have implemented the web service part of the Provider Information Directory as stated in the IHE Technical Framework.
SOAP web service: Provider Information Directory Service
SOAP interface is available and has been developed to respect the web service definition specified by IHE. You will access the Provider Information Directory Service at the following location: http://ovh1.ihe-europe.net:8180/HPDSimulator-ejb/ProviderInformationDirectory_Service/ProviderInformationDirectory_PortType?wsdl
This service offers the following methods:
-
ProviderInformationQueryRequest: it accepts batchRequest messages containing searchRequest elements
-
ProviderInformationFeedRequest : it accpets bachRequest messages containing addRequest, delRequest, modifyRequest and/or modDNRequest elements
Link with the LDAP Server
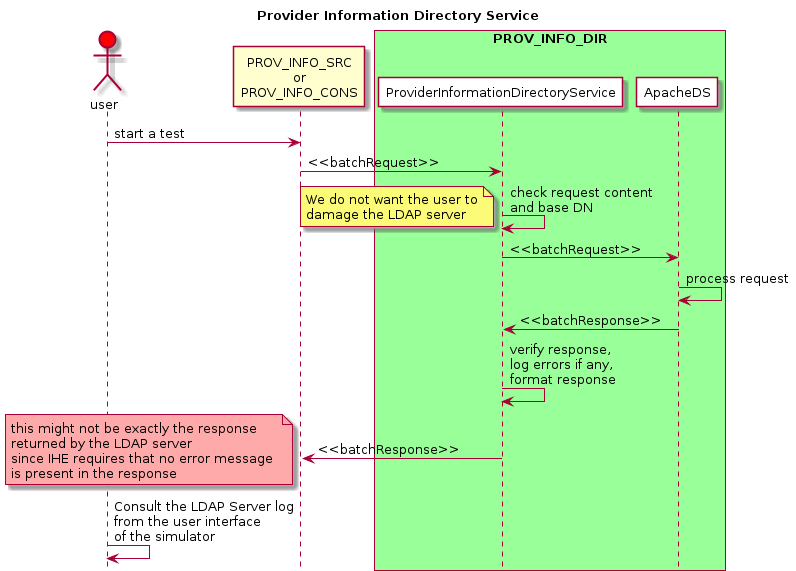
The Provider Information Directory Service is a front-end to the LDAP server configured as described in the first section of this document. The body part of the SOAP message is analysed and forwarded to ApacheDS through its DSML connector.
The received request may raise errors in ApacheDS which will be reported in the batchResponse returned by the tool; in that case, the error is stored in our database and the response is formatted to fit IHE requirements (no error message are sent back to the sender).
To verify that his/her query does not raise errors in the LDAP server, the user will be allowed to browse the logs under Simulators → Provider Information Directory → LDAP Server error logs.
Configuration
How to configure the LDAP Server (ApacheDS) and how to link the simulator and ApacheDS is explained in the Installation & Configuration manual of the tool and these actions shall only be performed by an administrator of the tool. If you feel like something is missing or goes wrong, feel free to contact the administrator of the tool.
Sequence diagram
To better explain the workflow triggered by a call to the Provider Information Directory Service, a sequence diagram has been generated, see below.
HPD - Provider Information Source
The Provider Information Source part of the tool is able to send DSMLv2 messages to feed the provider information directory.
To start, you will need to register your system under test as a HPD Provider Information Directory actor. To do so, go to SUT Configuration from the top menu bar and hit the “create a new configuration” button. Fill out the displayed form. Be aware that the URL you provide must be reachable by the tool (do not use private IP address nor host names).
Then, go to Simulators → Provider Information Source.
On that page, first select your system under test in the drop-down list and ensure that the connection information are correct.
A DSML message can contain several queries. To add an element to the message which will be sent to your system:
-
Select the kind of request to add (addRequest, delRequest, modifyRequest or modDNRequest)
-
Click on “Append a new request”
-
Select the organizational unit to create. This will set the base DN of the request then, you have several choices
-
For an addRequest request
-
Complete the DN of this new entry
-
The mandatory attributes to populate are selected by the tool based on the type of provider
-
You can add values to those attribures (if they are multi-valued - a + signe is displayed)
-
You can add optional atrributes
-
-
For a delRequest request
- Complete the DN with the uid of the entry to delete (for example)
-
For a modDNRequest request
-
Complete the DN of the entry to modify
-
Give the new RDN
-
Optionaly give the new superior
-
Specify whether or not the old RDN must be deleted
-
-
For a modifyRequest
-
Complete the DN of the entry to modify
-
List all the modifications which have to be done
-
Note that the tool has been populated with the list of object classes and attributes which might be known by the LDAP directory, this will help you with building your queries.
When you have all your search requests ready, hit the “Send request” button. The response is stored in the database and parsed by the tool. If its contains entries, their content will be displayed below the test report. The latter contains the messages sent and received which can be validated by calling the Gazelle HPD validation service (hit the green button).
Finally, a button invite you to perform another query. You will be able to either start a new message from scratch or to reuse the previous message.
Tips
When your message contains several searchRequest elements, you can edit or delete them using the icons on the right-hand of each message (under Batch Request).