Assertion Manager
Introduction
The assertion manager aims at linking Requirements (assertions) to the entity covering them.
An assertion can be covered by a:
- Test
- Test step
- Technical framework rule
- Model based validation
The assertion manager is linked to gazelle Test Management in order to link assertions to test, test steps and technical framework rules.
The assertion manager can be linked to multiple model based validation services.
The assertion Manager provides a web service to query assertions, the api is described here.
Concepts

Assertions
An assertion is the expression of a requirement.
An assertion is linked to an IdScheme.
An assertion is composed of:
- AssertionId
- Predicate
- Prescription level
- Section
- Page
- A document
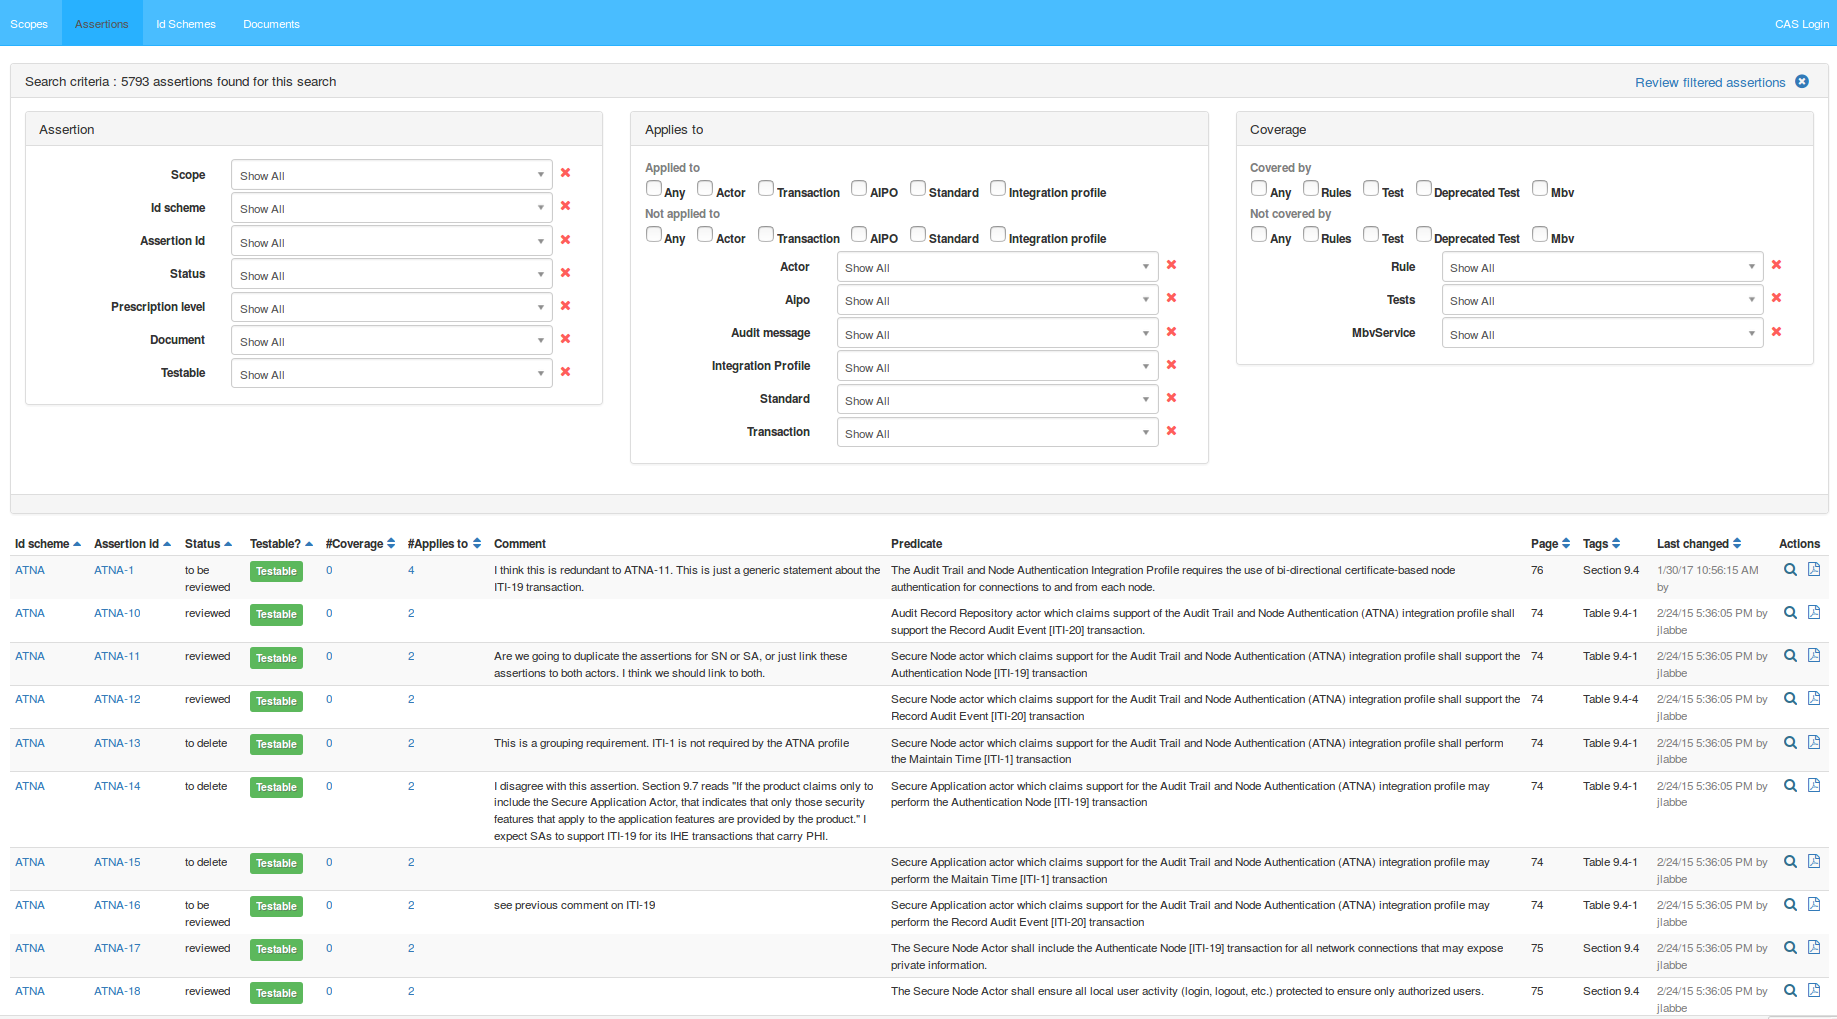
Click on “Assertions” link in the menu bar.
The page displayed lists all registered assertions and the seach criteria area to filter according to Assertion parameters, Applies to and/or Coverage:
Create assertion
The administrator user can create a new assertion:

Click on the button  , it will open a window containing a new assertion properties:
Fill the properties and click on button  to register the new assertion.
Click on button  to register and display a new assertion creation window.
Update deprecated coverage
To check and update the links between assertion and coverage tests click on the button  .
.
View assertion
Choose the first assertion of the list and click on the button ![]() .
.
It will display properties and document belonging to the selected assertion:

You can edit the assertion details by clicking on the Edit button  (refer to chapter Edit assertion for more details).
Click on button  to view the selected assertion XML (refer to chapter View XML for more details).
Edit assertion
Choose the first assertion of the list and click on the button ![]() .
.
It will open a new window containing the selected assertion details to edit.

View assertion XML
Choose an assertion from list and click on the button ![]() .
.
It will open a new window containing the XML that describes the assertion. An example of assertion XML is shown below:
<testAssertionSet xsi:schemaLocation="http://docs.oasis-open.org/ns/tag/taml-201002/ http://gazelle.ihe.net/XSD/OASIS/TAML/testAssertionMarkupLanguage.xsd">

    <common>
        <normativeSource>
        <refSourceItem srcname="IHE IT Infrastructure (ITI) Technical Framework   Volume 1  (ITI TF-1) Integration Profiles" uri="https://www.ihe.net/uploadedFiles/Documents/ITI/IHE_ITI_TF_Vol1.pdf" documentId="" versionId="" revisionId="13.0" resourceProvenanceId="IHE.net"/>
        </normativeSource>
        <target idscheme="ATNA"/>
    </common>

    <testAssertion id="ATNA-1">
        <predicate>
            The Audit Trail and Node Authentication Integration Profile
            requires the use of bi-directional certificate-based node authentication
            for connections to and from each node.
        </predicate>
        <prescription level="mandatory"/>
        <tag tname="Page">76</tag>
        <tag tname="Section">9.4</tag>
        <comment>I think this is redundant to ATNA-11.
            This is just a generic statement about the ITI-19 transaction.
        </comment>
        <status>TO_BE_REVIEWED</status>
        <testable>true</testable>
    </testAssertion>

</testAssertionSet>
View assertion document
Choose the first assertion of the list and click on the button ![]() .
.
It will display the pdf document belonging to the selected assertion.
Delete assertion
To delete selected assertion, click on the delete icon ![]() .
.
A confirmation panel will appear then click on the delete button.
Import assertions
Assertions can be imported into the AssertionManager. One assertionId must be unique in one idScheme.
Please use the following template to create your assertion file: https://gazelle.ihe.net/files/AssertionTemplate.xml.
Then go to the IdSchemes page and click the  button:

Select your XML file containing your assertions.
If the uploaded xml file contains an assertion that is already in assertion manager, then the assertion properties will be updated.
IdSchemes
An IdScheme is used to group assertions from one document.
It is used to import assertions.
It provides coverage feedback.
Click on “Id schemes” link in the menu bar.
The page displayed lists all registered IdSchemes and the seach criteria area to filter according to Scope Id Scheme and/or Model-based Validator Sevice:

Create IdScheme
As shown on picture above, the administrator user can create a new IdScheme.
Click on the button  .
.
It will open a window containing a new IdScheme properties:

Fill the properties and click on button  to register the new IdScheme.
Click on the button  to go back to IdSchemes main page without registring.
View IdScheme
Choose the first IdSheme of the list and click on the button ![]() .
.
It will display the properties of selected IdScheme:

You can edit the IdScheme details by clicking on the Edit button (refer to chapter Edit IdScheme for more details).
Edit IdScheme
Choose the first IdSheme of the list and click on the button ![]() .
.
It will open a new window containing the selected IdScheme details to edit:

Click on button to register the modified IdScheme.
Review IdScheme
Choose the first IdSheme of the list and click on the button ![]() .
.
It will open a window containing the list of the selected IdScheme assertions.
It also offers the possibility to browse this list and to display each assertion with its properties.

View IdScheme XML
Choose the first IdSheme of the list and click on the button ![]() .
.
It will open a window containing the XML that describes the IdScheme and its assertions.
An example of IdSchme XML is shown below:
<testAssertionSet xsi:schemaLocation="http://docs.oasis-open.org/ns/tag/taml-201002/ http://gazelle.ihe.net/XSD/OASIS/TAML/testAssertionMarkupLanguage.xsd">

    <common>
        <normativeSource>
            <refSourceItem srcname="IHE IT Infrastructure (ITI) Technical Framework   Volume 1  (ITI TF-1) Integration Profiles" uri="https://www.ihe.net/uploadedFiles/Documents/ITI/IHE_ITI_TF_Vol1.pdf" documentId="" versionId="" revisionId="13.0" resourceProvenanceId="IHE.net"/>
        </normativeSource>
        <target idscheme="ATNA"/>
    </common>

    <testAssertion id="ATNA-1">
        <predicate>
            The Audit Trail and Node Authentication Integration Profile requires the use of bi-directional
            certificate-based node authentication for connections to and from each node.
         </predicate>
        <prescription level="mandatory"/>
        <tag tname="Page">76</tag>
        <tag tname="Section">9.4</tag>
        <comment>I think this is redundant to ATNA-11.</comment>
        <status>TO_BE_REVIEWED</status>
        <testable>true</testable>
    </testAssertion>

    <testAssertion id="ATNA-10">
        <predicate>
            Audit Record Repository actor which claims support
            of the Audit Trail and Node Authentication (ATNA) integration profile shall support
            the Record Audit Event [ITI-20] transaction.
        </predicate>
        <prescription level="mandatory"/>
        <tag tname="Page">74</tag>
        <tag tname="Table">9.4-1</tag>
        <status>REVIEWED</status>
        <testable>true</testable>
    </testAssertion>
    ...

</testAssertionSet>
View IdScheme documents
Choose the first IdSheme from list and click on the button ![]() .
.
It list documents belonging to assertions in this IdScheme.

You can edit the document details by clicking on the Edit button ![]() :
:

Delete IdScheme
Deleting one idScheme will delete all the assertions it contains.
To delete one IdScheme, click on the delete icon ![]() .
.
A confirmation panel will appear then click on the delete button.
Scopes
A scope provides a way to group assertions that are in different IdScheme.
A scope contains assertions and one assertion can be in 0 or multiple scopes.
Click on “Scopes” link in the menu bar.
The page displayed lists all registered scopes and the scope filter area according to the keyword.

Create Scope
As shown on picture above, the administrator user can create a new Scope.
Click on the button  .
.
It will open a window containing a new Scope properties:

Fill the properties and click on button  to register the new Scope.
Click on the button to go back to Scope main page without registring.
View Scope
Choose the first Scope of the list and click on the button ![]() .
.
It will display the properties of selected Scope:

You can edit the Scope details by clicking on the Edit button (refer to chapter Edit Scope for more details).
Edit Scope
Choose the first Scope of the list and click on the button ![]() .
.
It will open a window containing the selected Scope details to edit:


To remove IdSchemes from Scope, select the available IdSchemes and click on button  .
.
To add IdSchemes to scope, select the available IdSchemes and click on button  .
.
And to link IdSchemes to Scope, select available IdSchemes and click on button  .
.
Click on button to register the modified Scope.
Delete Scope
Deleting one Scope will not delete the assertions it contains.
To delete one scope, click on the delete icon ![]() .
.
A confirmation panel will appear then click on the delete button.
Assertion Coverage
An Assertion can be covered by:
- A test
- A test step
- A rule
- A Model based validation
Assertion manager queries gazelle test managment to list all tests, test steps and rules available.

Configure gazelle_test-managment-url into administration page to point to your test managment instance (example: https://gazelle.ihe.net/GMM/rest/).
Touch the deployed package so that new configuration are taken into account.
In the following chapters you will learn how to cover an assertion.
Test
Click on “Coverage” then “Test to Assertions” link in the menu bar.

To link a test to an assertion:
Select a domain and integration profile.
Select a test by clicking the select link on the test row.
It will display the test description and enable “Link to” and “Unlink” buttons in the right pane.
Click on the “Link to” in the assertion row to link to the selected test.
The button will become an unlink button in red.

Test Step
Click on “Coverage” then the “Test steps to assertions” menu link
A test step belongs to test so as linking a test to an assertion, select the test.
Then select the test step by clicking on the test step row.
Rules
Click to “Coverage” then the “Rules to assertions” menu link.
To link a rule to an assertion:
-
Search the rule to link with the rules filtering
-
Rules will appear in the Filtered rules section, Select the rule to link, by clicking the select link in the rule row.
-
Assertion linked to the rule will appear
-
Search the assertion to link with the rule
-
Link the assertion to the rule by clicking the Link to button.
Assertion Applies to
Assertion can be applied to: an Actor, an AIPO, an Audit message, an Integration profile, a Standard, a Transaction. It works the same way for linking all the entities mentioned above, so only one will be demonstrated. Click to ”Apply to” then “Actors” menu link.

Filter and/or Select an “actor”
The actor description appears
Filter to select the assertion to link. Click “Link to” button

Model based validation service (MBVservice)
Assertion manager can fetch assertion coverage from services that provides coverage services.
To provide a coverage service implement: net.ihe.gazelle.assertion.coverage.provider.WsInterface
from:
<parent>
    <groupId>net.ihe.gazelle.assertion.coverage</groupId>
    <artifactId>gazelle-assertion-coverage-provider</artifactId>
    <version>5.0.1</version>
</parent>
List of services that provides an assertion coverage service:
- CDAGenerator
- GazelleHL7Validator
- XdStarClient
Configuration
Go to Administration -> Mbv Services
The page lists all registered Mbv Services.
You can add, update, Delete a mbv Service and synchronize coverages.

Add a MbvService
To add a new Mbv Service click Add new mbv service :
Set the keyword.
Set the url to the service without trailing slash, example: https://gazelle.ihe.net/CDAGenerator.
Click the Add new mbv service button
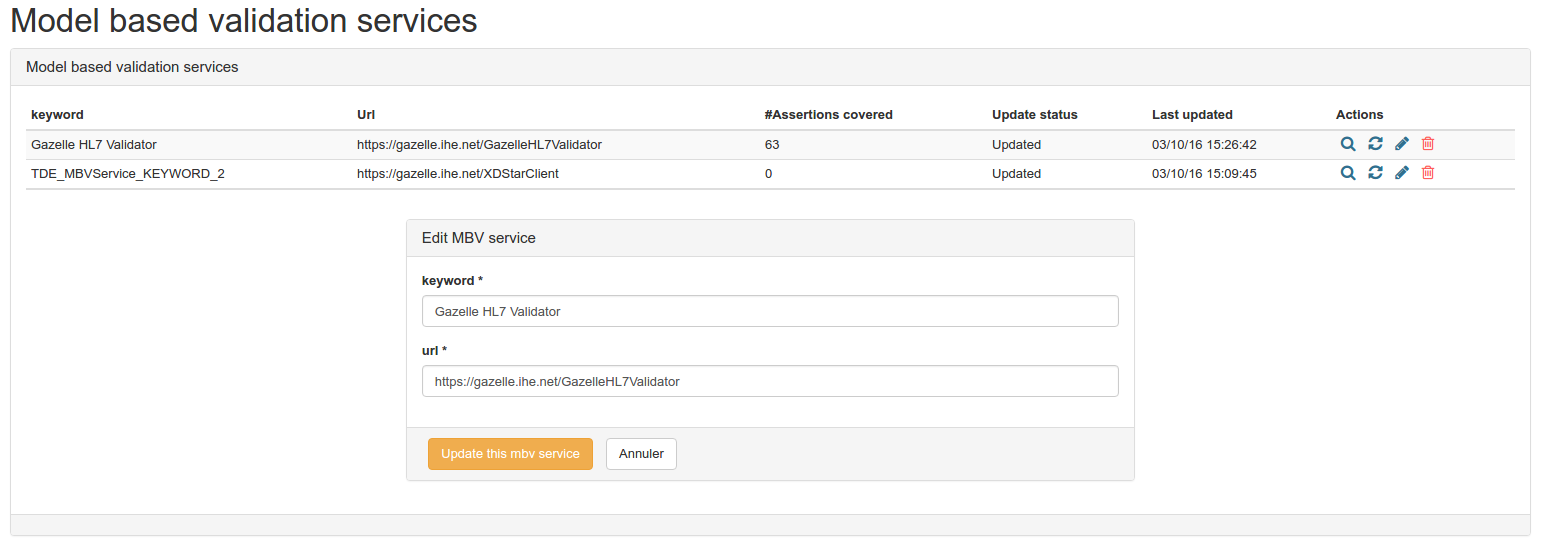
Edit
Click the edit button in the service row ![]() .
.
Click the update this mbv service button
Delete
Click the delete cross in the mbv service row ![]() .
.
Coverage Synchronization
Click on the synchronize button ![]() .
.
It will fetch the assertions covered by the service and display the synchronization status:
Covered assertions: Assertions that are covered by the service and in Assertion manager.
No more covered: Assertions that are no longer covered by the service and in Assertion manager.
Missing assertions: Assertions that are covered by the service but not in Assertion manager.

Coverage FeedBack
Assertion manager provides coverage details.
Idscheme Page
For each idScheme coverage statistics are displayed, and a progress bar to visualize assertion coverage.
#Covered throuh tests
Number of assertions covered by a test or testStep or more
#Covered throuh rules
Number of assertions covered by a rule or more
#Covered throuh MBV
Number of assertions covered by MbvService validation or more
Assertions list page
This page lists all assertions and displays coverage statistics by assertion.
#Covered by tests
Number of test or testSteps covering the assertion
#Covered by rules
Number of rules covering the assertion
#Covered by MBV
Number of validations perfromed by MbvServices covering the assertion
Assertion detail page
When viewing an assertion, a coverage section is visible.
The coverage section lists all the entities covering the assertion and provides a link to the entity.
It is possible to unlink a Test, Test step, rule from this page. When clicking the Unlink button, a confirmation panel is displayed.
Administration
How to update page numbers in Assertion Manager ?
Assertion Manager is the Gazelle tool to handle the assertions that vendors shall respect to be compliant with a profile. Each profile is identified with a unique idScheme, which is associated with a PDF document, the official reference of the profile.
When someone enters a new assertion, he needs to fill in the page number where the assertion is found, and the section / figure / table number.
The main problem is when the document is updated, the pages numbers are not good anymore, and it’s then needed to update every assertion, which could be very time consuming manually. This guide will help you to automate the process at best.
Get the table of contents
This step requires to use Microsoft Word if the document is in doc/docx format. With OpenOffice / LibreOffice the content may be shift, and the page number won’t be the same as in the official documentation.
The first step consists in extracting the table of contents from the technical reference. The technical reference is often published in both DOC and PDF. If available in DOC format, consider downloading this file, and check that the document is properly formated (with numbered sections). The document have probably a table of content, but it may not be fully detailed. It’s very important to have the most detailed table of contents you can have.
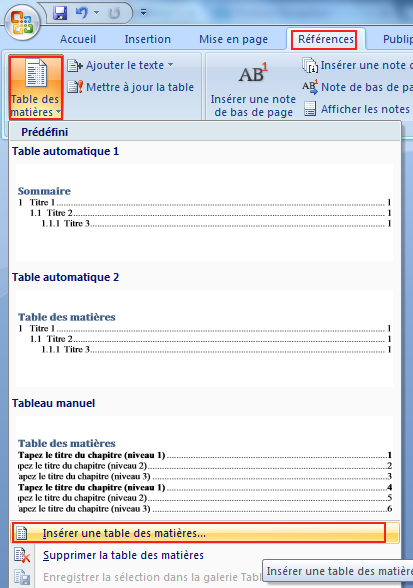
To do this, go to the bottom of the page of your doc document and insert a table of content as the following :
- Click on the “References” tab
- Click on the “Table of contents” arrow button
- Go to the table of contents tab
- Put the maximum number at the “levels” section
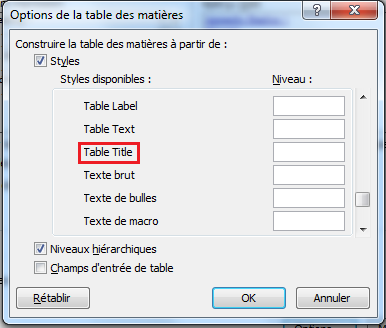
- To add tables to the table of contents, click on the “Options” button
- Find the entry “Table Title”, and add any number in the “Level” field
- Validate

It’s important to insert the table of content at the bottom of the document, otherwise the page numbers will be shift by your new table of contents.
Now, you should have a detailed table of contents like below, with the section (or table) number on the left, and the page number on the right.

Once you have a properly formated table of contents, the next step will be to transform it into an association between sections and page numbers.
### Associate the section and the page number
The easiest way to associate the section and the page number is to use regular expression (regex) to delete the useless content. You can do regex with many software (vim, oxygen) but one of the most user-friendly way to check in real time your regex is to use an online regex editor as regex101.com
Copy and paste your table of contents in the “Test String” section. With a table of content generated through Word, you can use the following regex :
With /gm option enabled (the regex will apply on multiple lines) :
^\[a-zA-Z ]\*((\d?\.?)\*(-\d)?).+\t(.+)
This regex will work for a table of contents which uses digits or letters as first indices.
^(-Text- )*(\[A-Z](\.\d(\.\d)?)*)*(-\d)?.+\t(.+)
This regex will work for a table of contents which has text before listing the first index of each content line. Simply replace “-Text-“ with the text to separate (eg. : “Appendix A” can be returned as “A”).
It will seperate the section number in different groups, depending on the regex, as you can see in the image below :

It’s then easy to apply an sql script which updates page number from the section number.
A PL/SQL function can be found in the gazelle-assertion-gui project (under src/main/database/update), and is named “update_page_number_based_on_document_id_ignore_section_or_table”. It takes 3 input parameters : The document’s id (which you can find in the ‘Documents’ section of Assertion Manager) The section The page number
Then, you just have to use the “Substitution” function of regex101 to replace the content with :
select update_page_number_based_on_scheme('IDDOCUMENT', '\1', '\3');
- IDDOCUMENT must be replaced with the id of the document you work on
- \1 will put the content of the group captured in the firsts parenthesis (section number)
- \3 will put the content of the group captured in the thirds parenthesis (page number)
(Be sure to check the group numbers which may change depending on the regex you use)
A typical page update query will then look like the following :
select update_page_number_based_on_document_id_ignore_section_or_table(24, '1.1', '12');
This will update the document id n°24 to point any section marked as “Section 1.1” to page 12.
Create and apply the SQL script
The last step simply consists in creating a SQL file with the result of the regex substitution and apply it.
Create a new SQL file and copy / paste the content of the regex substitution function Apply the script on assertion-manager database with plsql :
psql -U gazelle -d assertion-manager < ~/yourPageUpdateFileName.sql
The assertion-manager database has a caching system. You may have to wait 3 minutes before seeing the changes on the pages numbers.

Updating section or table numbers
As the documents evolve, the sections or tables and their content might be updated (or deleted), and the assertion might not be up to date and point to the wrong section of the document.
To update this, a PL/SQL function can be found in the gazelle-assertion-gui project (under src/main/database/updateSection.sql), called “update_section_number_based_scheme_and_assertion_id”.
It requires 3 parameters :
- idscheme, the assertion scheme’s name (eg. : ATNA)
- assertion_id, the assertion’s identifier (eg. : ATNA-1)
- sectionnumber, the updated section number to which you want the assertion to point
A fourth, optional parameter allows you to modify the name between a section, a table, or a figure (if the content of an assertion moved from a section to a table, for example) :
- name, which can be ‘Section’, ‘Table’, or ‘Figure’.
For ease of use, it is recommended to create an SQL file in which you update all the assertions where you found the section to be wrong.
An example of a typical section update :
select update_section_number_based_scheme_and_assertion_id('ATNA', 'ATNA-10', '9.1-1');
An example of a name update :
select update_section_number_based_scheme_and_assertion_id('ATNA', 'ATNA-10', '9.1.1', 'Section');
The above line would change the tag from, for example, “Table 9.1-1” to “Section 9.1.1”.
Once your file is complete, you can apply the script using plsql, as before :
psql -U gazelle -d assertion-manager < ~/yourSectionUpdateFileName.sql