XDS Toolkit
This is an extract of XDS Toolkit documentation available in the developer’s wiki
Conformance Test Tool
The Conformance Test Tool will host all conformance testing in Toolkit. The initial release is part of XDS Toolkit. New features will be added over time.
Each Document Sharing actor requires a different collection of supporting actors to support its testing. These actors must be initialized to a known state: configured with endpoints of other actors, IDs, and loaded with appropriate data. These actors and their state are referred to as the Testing Environment.
There are two types of test initiation: tool initiated and SUT initiated. This indicates whether the test tool or the SUT initiates the first transaction of the test.
The Conformance Test tool is organized into three area: testing environment setup, initialization, and test operation which are discussed in the following sections.
Testing Environment Setup
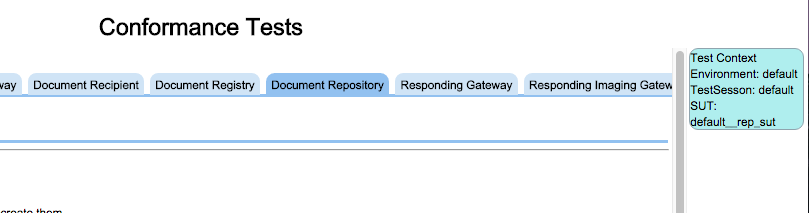
The Testing Environment Setup starts with the selection of the actor type to be tested. Once selected, the available profile options that affect the testing of this actor will be displayed. The first tab in this collection is always the Required tests for the selected actor type.
Initialization
Before tests are run, the Testing Environment must be initialized. Before this can be done, we must indicate the system to be tested, the environment (Toolkit environment, not test environment) to be used and the test session where test results will be stored. These selections are made using the Test Context editor found in the upper right corner of the tool. This editor is documented separately here.
Once the Test Context is established, the button labeled Initialize Testing Environment can be used to build the testing environment. The initialization that occurs is different for each actor type.
As an example of actor specific initialization, here is what happens for testing a Document Repository :
A Document Registry simulator is created. A Patient ID is generated and is sent to the Registry in a Patient Identity Feed message. Instructions are then displayed for the user to configure the Repository under test to forward Register transactions to this Registry simulator.
When this initialization is complete, status and details about the initialization is displayed immediately below.
This automatic creation of the necessary supporting state is called Orchestration.
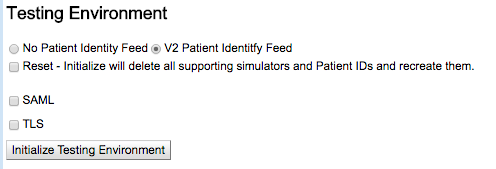
While the orchestration is different for each actor type there are parts common to all actor types.They are the Reset, SAML, and TLS selections.
If Reset is selected when the orchestration is created via Initialize Testing Environment button then the existing state (simulators, Patient IDs etc.) are deleted and re-generated. If Reset is not selected then the stored state of the orchestration is loaded and displayed. Reusing the orchestration is the typical way to use the tool. A reset destroys all existing state and may affect tests not yet completed. But, it is always necessary to have a reset button.
The SAML and TLS selections control whether SAML and TLS are used when conducting the test. They can be set and unset as is needed by the tool user. For example to run a single test without TLS, un-select the TLS selection and run the single test. To re-run the test with TLS simply set the TLS selection and run the test again. Same usage follows for SAML.
The operation of the SAML system is documented here.
An example of the orchestration output is:

The System Under Test Configuration documents what is known about the SUT. In this example the SUT is a simulator so links to its configuration and logs are provided.
The Supporting Environment Configuration section documents the elements that were created by orchestration to support the testing process. In this case a Registry simulator (with links to its configuration and logs as well as a summary of its configuration) and a single Patient ID that will be used.
Finally an instruction is issued to configure your Repository SUT.
Auto Initialization
This tool maintains a great amount of state regarding your testing activities. Each time you open this tool this state must be loaded into the display. This can be done automatically or manually based on configuration.
In toolkit.properties (edited with the Toolkit Configuration tool) is a property named Auto init conformance tool. If set to true then the Conformance Test Tool will initialize the screen, including loading the orchestration results (test environment initialization) automatically when you select an Actor type or option. If this property is set to false then you will have to use the Initialize Testing Environment button to load all of the current status.
Re-initialization
There are times when you want to discard your current test results and start again. This can be done at two levels.
Within the initialization section of the tool is a check box labeled Reset - Initialize will delete all supporting simulators and Patient IDs and recreate them. If set when you press the Initialize Testing Environment button the current test context (orchestration) will be discarded and recreated. This includes the Patient IDs used. Beware that when this is done the content is really deleted. You must separately delete the test results using the trash can icon.
The other approach is much broader. The above reset affects the initialization and results for a single option on a single actor. If you want to do a broader delete open the Test Context dialog (blue box on the upper right corner of the display), select a Test Session and press Clear Test Session. This will delete the orchestration and test results for all actors tested using this test session. It will even forget which system you were testing.
Color codes
There are three color codes used in the display:
- white - test collection/test/section/step not run
- red - test collection/test/section/step run but with error
- green - test collection/test/section/step run successfully
Note that along with the red color, errors are also shown with a danger symbol and successes are shown with the check mark symbol.
Test Operation
This shows the top level view of the Test Operation portion of the Conformance tool.
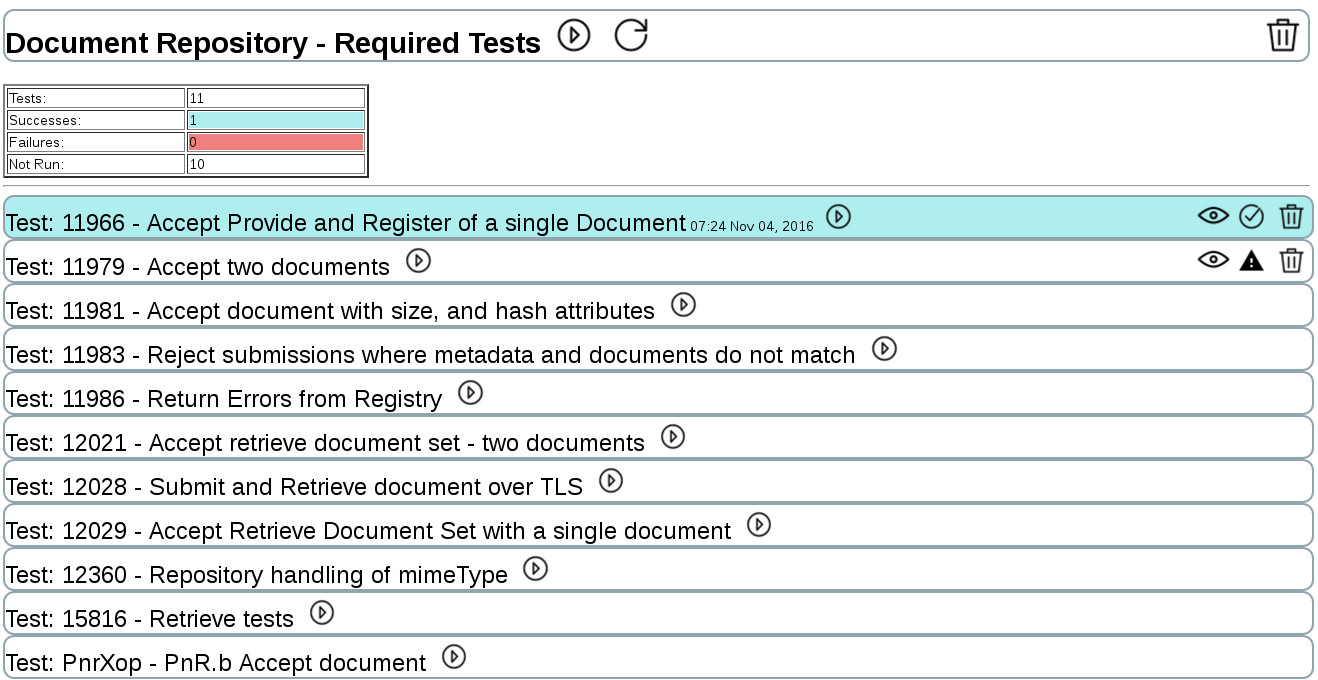
The top bar displays an overview of the testing. In this example the words Document Repository - Required Tests indicate the actor type being tested and the test grouping selected. The bar has a white background since not all tests have been run.
Next is a right-facing arrow which is the run button. Since this run button is on the overview, it runs all tests in the collection. The recycle button reloads test status in cases where something changed on disk but is not reflected in the display. The trash can deletes all test logs for this test collection.
Following the top bar is a table of test statistics. The color codes are documented in this table.
The rest of this section is the list of tests, each shown as a horizontal bar. Each is color coded with its status. Tests that have been run (with error or success) show a run date and an eyeball icon which takes you to the test details tab (Toolkit Inspector).
Clicking on a test bar will open the test, showing its details right below the bar. Any number of tests can be open at once.
Interaction Sequence Diagram
When a test that has been run is opened the first thing displayed is the interaction sequence diagram.
Note: This diagram shows minimal information and does not properly show interactions between more than two actors. It will be expanded in later releases.
This diagram shows the messages passed between tools and SUTs. Each message, when clicked, will open the Inspector tab showing the details of the transaction (same as the eyeball icon).
Messages carrying errors are marked with an X symbol. The X is colored blue if the error was expected and red if it was not expected.
Section display
Next in the display is the collection of sections. (More about sections).
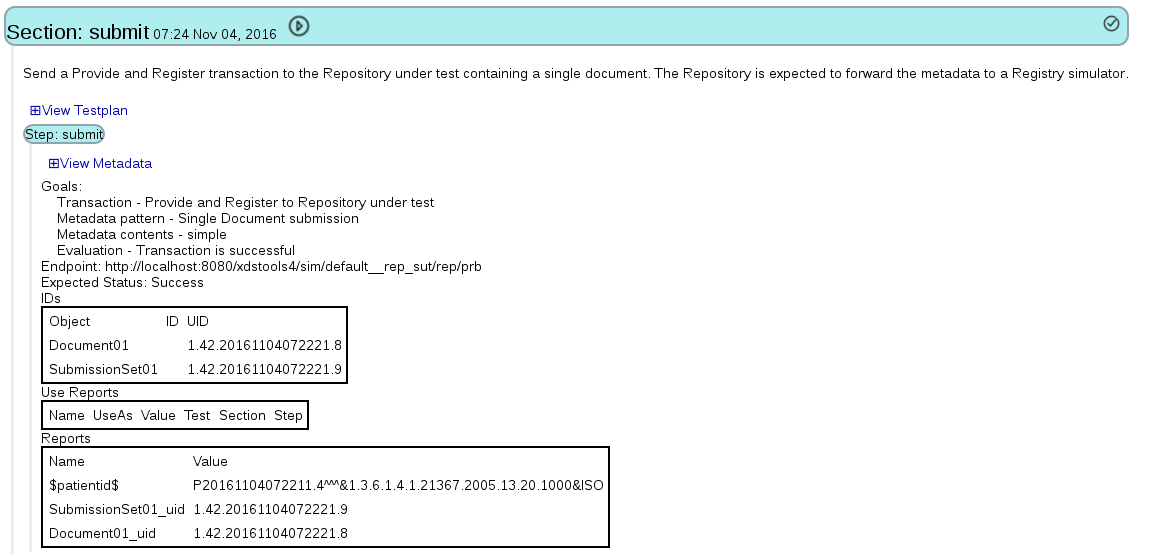
Since a section is independently runnable there is a run button and run date.
Note that there is no inspect button (eyeball). At the moment the Inspector tool is test oriented and not section oriented so the ability to launch the inspector to view test logs is only attached to the test display.
A section displays its documentation at the top. Next is a link to display the testplan. The testplan is the XML encoded script that actually runs the section execution. It is viewable because many users are familiar with its format and semantics.
Next is displayed the steps within the section. The header of the step includes the goals of the step, the endpoint used and the expected status (Success or Failure - negative testing is supported so sometimes Failure is the expected outcome).
The generated IDs are displayed. Two kinds of IDs are generated and documented here: entryUUIDs and uniqueIds. Every DocumentEntry, Folder, and SubmissionSet contains a uniqueId which is assigned by the Document Source. They are included here. The Document Source may allocate UUIDs for those objects. If they are allocated then they are published here as well.
Next is the Use Reports and Reports. They define a publish/subscribe feature that is used by one step to publish a value that can be subscribed to by a later run step. Reports publish IDs that may be used later so they include a name and a value. Use Reports target a published Report so they include parameters to target the specific Report (Test, Section, Step and Name). They also include UseAs which indicates the local variable (in the metadata included in the testplan) to be updated. The reported value is also displayed.
Links and buttons in this tool connect the user to the following tools:
- Simulator configuration tool
- Simulator log display tool
- Test Results Inspector tool
- Test Context editor
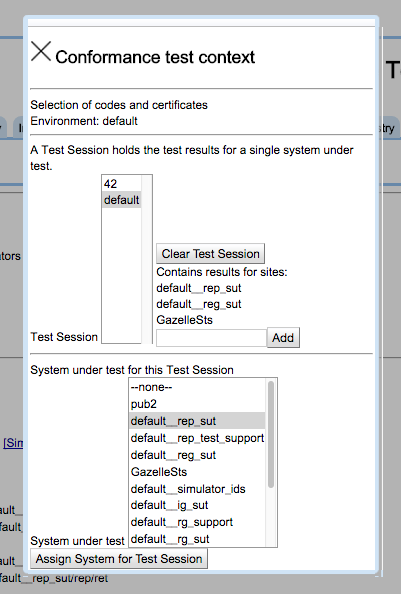
Test Context Definition (test-context-def)
The Test Context describes the environment that Conformance Tests run in. It is managed by the Conformance Test Tool via the blue box on the top right corner of the window. Changes can be made to the Test Context by clicking on the blue box.
The Test Context looks like this when open for editing.
All elements of the Test Context are managed in the External Cache. In the documentation that follows the location in the External Cache of the relevant element is labeled as ExternalCache:element (ExternalCache:TestLogCache for example where TestLogCache is a directory in the External Cache). The External Cache itself is a file system directory where Toolkit data and configurations are managed.
Test Context Structure

Environment
The Environment manages the codes configurations and client certificates. The codes configuration (codes.xml) (ExternalCache:environment/environment-name/codes.xml) is a table of the acceptable codes configured into the Affinity Domain being tested. The default testkit, which contains templates for all test messages generated by toolkit, is configured against this codes configuration.
A client certificate, if present, contains a single certificate used by the toolkit test engine to initiate TLS connections. TLS connections received by toolkit (more specifically by simulators in toolkit) are managed by a certificate installed directly in Tomcat.
The testkits area of the environment (ExternalCache:environment/environment-name/testkits) optionally contains a copy of the default testkit re-configured for the specific environment’s codes configuration. (The default testkit always aligns with the codes configuration in the environment ‘default’.) More specifically, the testkits area contains a collection of testkits, each testkit being used by the Test Session of the same name. Said another way, the test kit found at ExternalCache:environment/environment-name/testkits/42 (if it exists) is used by Test Session 42. If ExternalCache:environment/environment-name/testkits/42 does not exist then ExternalCache:environment/environment-name/testkits/default is used. If that does not exist then the internal testkit is used.
Note that if toolkit is being used in conjunction with Gazelle for CAS testing, the Toolkit Test Session name aligns with the Gazelle Test Session name.
If a new codes configuration is created, the corresponding testkit can be generated automatically (which is good since it requires a lot of editing). The tool to generate this testkit is found on the Toolkit Configuration tab of toolkit.
Toolkit can manage multiple environments. There is always a ‘current environment’ selected. The default environment name is ‘default’ which is automatically installed when Toolkit is started. The default environment contains the codes configuration used at IHE Connectathons, no client certificates, and no testkits. It contains no testkits because the internal testkit is used.
Test Session
The Test Session defines a testing session. More specifically it identifies a repository of test results located at ExternalCache:TestLogCache/test-session-name/. Within that directory is found:
- a directory containing the test results for each test that has been run named for the test ID
- a file site.txt which contains the system under test
- a directory orchestration which contains a directory named for each actor type tested in this test session. That directory holds a single file, orchestration.properties, which is used to maintain the state of the testing process for that actor.
Remember that a test session manages test results for a single system. In toolkit a system may contain only one instance of an actor type.
Note that there is a second way to create or select test sessions in the control at the top of the tool. This edits the same information. This control will be removed from the Conformance Tool in the future and should not be used. The same goes for the Environment selector at the top of the tool.
System
The system, or System Under Test, is a configuration of endpoints and ids that identify the system being tested. This system definition resides at ExternalCache:actors/system-name.xml.
Note: if Toolkit is being used in conjunction with Gazelle for CAS testing then the system in Toolkit maps to a system in Gazelle.
Archiving Test Results
To archive the test results from a testing session we suggest ZIPing and saving the entire External Cache.
SAML Validation against Gazelle
Toolkit incorporates SAML testing by integrating with Gazelle Secure Token Service (STS). Toolkit is configured with the necessary Gazelle URLs and makes remote calls to Gazelle as necessary.
This service is available in the Conformance Tool and specific function tools such as FindDocuments. These two tool groups offer slightly different services.
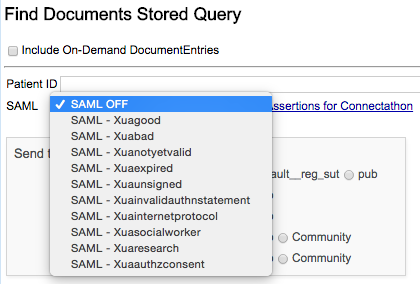
Function tools such as FindDocuments and Submit Provide and Register offer a SAML dropdown where the level and type of SAML support can be chosen. The selections are No SAML or the type of SAML to be included. If something other than No SAML is selected then a SAML header will be sent in the transaction. The selection then controls the type of SAML header that will be sent. The choices are documented here.
The Conformance Tool offers a SAML checkbox. If checked a good SAML assertion is obtained from the STS and is included in the message to the system under test.
Conformance Tool support for bad SAML assertions is isolated to a separate group of tests offered for each actor type. The group of tests holds a test for each type of bad assertion offered by the STS. (note this feature not available until the 4.1.0 release).
Configuration
Toolkit properties
Toolkit properties (editable via the tool Toolkit Configuration) contains two properties that control SAML operation.
- Enable SAML (true/false) - if false all SAML controls and operations will be hidden.
- Gazelle Assertions for Connectathon URL (URL) - link to SAML assertion documentation page (supported by Gazelle developers)

GazelleSts system
Included with the Toolkit installation is a system configuration (site) named GazelleSts which holds the Gazelle endpoints for operation of the service. At Toolkit startup this system is installed if it is not already present. These can be edited to point to a different server. To restore the default settings, delete the system and restart toolkit.
Operations
Toolkit supports two STS operations: generate and validate.
When sending a transaction that includes a SAML header, Toolkit will first send a transaction to the STS to retrieve a SAML Assertion of the requested type. That assertion is inserted into the Document Sharing transaction.
When a Toolkit simulator is configured to require SAML and no SAML assertion is included then a SOAP Fault is returned.
When a Toolkit simulator receives a SAML assertion it forwards the assertion to Gazelle STS for validation. If validation fails then a SOAP fault is returned to the simulator caller. If validation does not fail then processing of the transaction proceeds.

Gazelle Endpoint
There are different queries you can do (with links to samples) :
The username field is linked to the type of SAML header that you get.
Design - Test Client
The inclusion of a SAML header in a request message sent by the test client is triggered by the parameter $saml-type$. If this parameter is missing or has null or “” value then no SAML header is generated. If it is present it shall have the value of one of the usernames defined in the Gazelle STS service.
If a SAML header type is specified, then:
- a SAML header will be fetched from the STS service
- the SAML header is inserted in the SOAP header
- the transaction is sent
Design - Simulator
If a SAML header is received in the SOAP header of a transaction the STS service will be called to validate it. If the validation fails then the transaction fails. We need to look up whether a failure is reported in a SOAP Fault or a RegistryResponse (I think it is a SOAP Fault).
All Simulators corresponding to SOAP messages will have added a new configuration parameter, SAML_Required. If true and no SAML header is present then an error is returned. The default value of this configuration parameter is false.
Communicating with Gazelle
Gazelle offers a Web Service (SOAP) interface for requesting/validating SAML Assertions. We will not be using Axis2 for this. Instead we will use raw HTTP but include the necessary SOAP stuff as content in the HTTP request.
There is currently in the test client a StsTransaction test step instruction, essentially a HttpTransaction class under the covers, that can be configured in a test plan. An example of its use can be found in .
This test plan contains two sections. The “samlassertion-issue” section should be used to initiate the request to Gazelle from the test client. To validate an assertion, use the “samlassertion-validate” section.
Test organization · usnistgov/iheos-toolkit2 Wiki · GitHub
Toolkit defines a test as a group of transactions that interact with the system under test (SUT). A transaction is defined as a parameterized template managed by a test-specific control script.
Tests have a highly organized structure. The key concepts are:
- Test Kit
- Test Collection
- Test
- Section
- Step
Test Kit
A Test Kit is a library of tests that can be run in Toolkit. Toolkit always ships with an internal Test Kit that is located in the WAR file. Optionally, the External Cache can hold multiple alternative Test Kits. There can be multiple copies of a test. There is a logical search path for finding a test definition.
Test Collection
A test collection is a list of test IDs. Test collections are created for many reasons and they are mostly hidden from the user’s view. Any time you see a grouping of tests in the user interface there is a test collection behind it. The most visible test collection is the grouping of tests for an actor or option.
Test collections are managed indirectly by indexing tests with the collections they belong to. Each test definition has a file collections.txt which holds the name of all collections that test is part of. The master index is created each time Toolkit is started or when the Reindex Test Kits button is pressed in the Toolkit Configuration tool.
Test
A test is an identifiable unit of testing that is indexed in Gazelle and assigned to a known actor and option. A test can be run using the Conformance Test Tool. Sometimes tests depend on other tests. When they do they reference the log files produced by the other tests. Running a test when the dependency test has not been run leads to an error.
Section
A test is comprised of one or more sections. A section is the smallest independently run-able element of testing. A section can be run through the Conformance Test Tool. Sometimes sections depend on other sections within the test. A section is defined in a file named testplan.xml within the directory defining a test. The running of a section generates a single log file in the External Cache.
Step
A step generates a single transaction. A step cannot be run in isolation. When a section is run, all steps in the section are run in the order they are coded in the testplan.xml file. The execution of the section terminates when it runs out of steps to run or when a step fails.
A step can reference the output of a previously run step, in the same section, a different section of the same test or in a different test. The log file produced by testing, log.xml, is generated at the section level (a section generates a single log.xml file) but it is the step that references or is referenced across tests.
External Cache · usnistgov/iheos-toolkit2 Wiki · GitHub
Toolkit is made up of two components: the WAR file which is installed under Tomcat and the External Cache. The WAR is the tool and its static data. The External Cache is the data store for toolkit where all your test results, simulators, and configurations live. The External Cache persists across installations/updated to the WAR file.
Technically the External Cache is a readable/writable directory on the same system that runs the Tomcat supporting Toolkit. The linkage between Toolkit and the External Cache is an entry in the toolkit.properties file inside Toolkit. If you are running multiple copies or versions of Toolkit they must each have a different directory configured as their External Cache. The path to the External Cache (/home/bill/tmp/ec on my development machine) must not contain white space or special characters.
Toolkit will not run without an External Cache. The internal file toolkit.properties contains a pointer to this directory. If the directory configured does not exist or is not writable at toolkit startup an error message will be displayed on the user interface. To use toolkit you must edit toolkit.properties using the tool named Toolkit Configuration.
If toolkit detects that the External Cache is fresh (readable, writable, but empty) then it will automatically initialize it. A key part of this initialization is the creation of the default environment which is named default. This environment will be initialized with the file codes.xml which contains the XDS Affinity Domain code configuration. As delivered for IHE Connectathons, this will be the required code configuration for the event.
These are the main sections of the external cache (defined by the directory name within the cache)
actors/
environment/
simdb/
TestLogCache/
actors
actors/
    blue.xml
    red.xml
Collection of XML files that define the configured systems known by toolkit. Earlier versions of Toolkit referred to these as Sites. We are gradually moving to the name Gazelle uses - system. A system has a name and a collection of IDs and endpoints that define the configuration of a system. A system can hold the configuration for a single actor of each type. So, if you have two Document Registries you need to define two systems. But if you have a Document Registry and a Document Repository they can be configured in a single system.
Although a site file can be edited by hand it is usually edited with the Site/Actor Configuration tool (recently renamed to Systems Configuration tool).

Each system is defined by an XML file. The XML (and not the filename) defines the system name. For example (see below), this file blue.xml which holds a system definition. The system name is OTHER_NIST_BLUE_2016 and not blue.
   urn:oid:1.3.6.1.4.1.21367.2011.2.6.152
   https://nist26:9085/tf6/services/xdsrepositoryb
   https://nist26:9085/tf6/services/rg
   https://nist26:9085/tf6/services/xdsrepositoryb
   http://nist26:9080/tf6/services/xdsrepositoryb
   http://nist26:9080/tf6/services/xdsregistryb
   http://nist26:9080/tf6/services/xdsrepositoryb
   http://nist26:9080/tf6/services/xdsregistryb
   https://nist26:9085/tf6/services/xdsregistryb
   http://nist26:9080/tf6/services/rg
   https://nist26:9085/tf6/services/ig
   https://nist26:9085/tf6/services/xdsregistryb
   http://nist26:9080/tf6/services/ig
   http://nist26:9080/tf6/services/ig
   https://nist26:9085/tf6/services/ig
   https://nist26:9085/tf6/services/rg
   http://nist26:9080/tf6/services/rg
   https://nist26:9085/tf6/services/xdsrepositoryb
   http://nist26:9080/tf6/services/xdsrepositoryb
environment
An environment defines the code set used by the Affinity Domain and the certificate used by toolkit to initiate TLS transactions. When toolkit receives transactions, in simulators, the certificate configuration is done in Tomcat.
The default environment, installed in the external cache when it is initialized by toolkit, looks like:
environment/
           default/
                  codes.xml
When we add the configuation for the North American Connectathon in 2016 the environment configuration looks like:
environment/
           default/
                  codes.xml
           NA2016/
                  codes.xml
                  keystore/
                           keystore
                           keystore.properties
The new directory, keystore, holds the Java keystore and the properties describing it. The contents of keystore.password are:
keyStorePassword=changeit
The directory names under the environment directory name the usable environments. They are chosen at the top of the tool pages where they are used.
Starting with Toolkit V4.0.0 an environment can define a separate [Test Kit][32]. This test kit can be a replacement or extension of the internal test kit.
simdb
This is the database of simulator configurations and data. Simulators are organized by Test Session and based on an Environment. A simulator name is the concatenation of the Test Session name, two underscore characters, and the simulator ID. Simulators are literally owned by a Test Session and so have the Test Session name embedded in their name.
Test Session
To understand simulator naming you must first understand the use of Test Session. A Test Session is a separate collection of data to support a testing situation. Some think of Test Session as being the same as User. But toolkit does not perform user authentication and does not maintain information about users. Test Session is tied to what you are testing and not who is doing the testing. For example, if you are testing two Document Registry implementations and you want to keep their test results separate you would use two Test Sessions.
A test session holds two types of data: conformance test results and simulators. Each of these data types are maintained in different parts of the external cache.
simdb continued
The structure of simdb looks like:
simdb/
      bill__rr/
              reg/
              rep/
              rr/
              sim_type.txt
              simctl.ser
              simId.txt
bill__rr is the name of a simulator. bill is the name of the Test Session that owns the simulator. rr is the the local name (within the test session) of the simulator. The full name (bill__rr) is always used as the identifer.
sim_type.txt - holds the simulator type
simId.txt - holds the simulator ID (bill__rr in this example)
simctl.ser - holds the simulator configuration (binary file)
This particular simulator is a composite simulator. It is constructed from multiple simpler simulators.
This is a combined Document Repository and Document Registry. The reg directory holds data for the Registry. The rep directory holds data for the Repository. The rr directory (simulator local name) holds data for managing the composition.
TestLogCache
This directory holds the results of conformance tests. The structure of this directory looks like:
TestLogCache/
     bill/
          11966/
                11966
                patientFeed/
                            log.xml
                submit/
                            log.xml
                eval/
                            log.xml
     GazelleSts/
     orchestration/
     site.txt
The directory bill names the Test Session used to run the tests.
The directory 11966 names the test that was run.
The file 11966 is a binary form of the log files used by the Inspector.
patientFeed, submit, eval are test sections - the individual parts of the test. Each section has its own log file, log.xml.
The directory GazelleSts holds details of the connection to the Gazelle Secure Token Service for getting and validating SAML assertions.
The directory orchestration hold test context for the Conformance Test Tool.
The file site.txt holds the name of the system being tested in this Test Session by the Conformance Test Tool. More specifically this is managed by the Test Context.